Learn how to change garage door torsion springs safely with our step-by-step guide, designed for a professional, risk-aware approach.
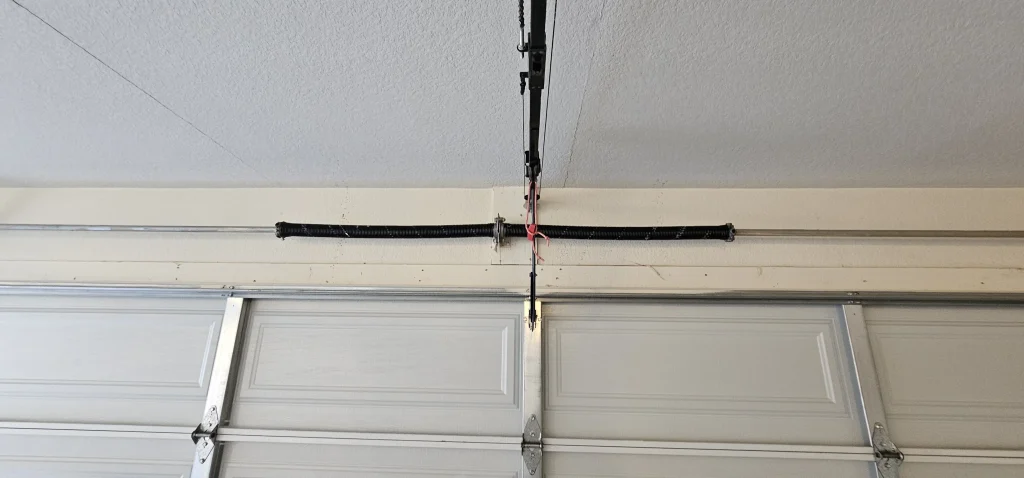
Torsion springs are a central component of any garage door system. They manage the tension required to lift and lower the door safely. Over time, these springs wear down due to regular use, temperature fluctuations, and general aging. Knowing how to change garage door torsion springs is essential for homeowners aiming to maintain a functional and safe garage setup.
The process of replacing torsion springs is a highly technical task. These springs are wound tightly, holding a large amount of stored energy. Mishandling them can lead to injury or damage to your garage system. That’s why it’s important to approach the task with care, the right tools, and a clear understanding of each step involved.
This blog outlines how to change garage door torsion springs while prioritizing safety and accuracy. It includes expert insights, step-by-step guidance, safety practices, and when it’s best to call a professional. We’ve also included answers to frequently asked questions and information about how GT Garage Door Repair can support you.
Safety Preparation Before Changing Garage Door Torsion Springs
Evaluate the Condition of the Garage Door System
Before starting any repair or replacement, conduct a detailed inspection of your entire garage door system. Look closely for signs of wear, rust, misalignment, frayed cables, cracked rollers, or bent tracks. Check whether the door opens and closes evenly or if it jerks or sticks during movement. Listen for grinding, squeaking, or banging sounds that may indicate underlying problems. Confirm that the torsion spring itself is the issue, as similar symptoms may arise from worn cables, broken hinges, or damaged rollers. Accurately diagnosing the problem will ensure that you address the root cause and avoid unnecessary or unsafe repairs.
Use the Proper Safety Gear and Specialized Tools
Working with garage door torsion springs can be extremely dangerous due to the high tension they are under. Always use the correct tools specifically designed for this task. Essential tools include high-quality winding bars (never substitute with screwdrivers), vice grips, a sturdy wrench set, and a socket set.
Personal protective equipment (PPE) is just as necessary. Wear heavy-duty work gloves to protect your hands from sharp components and recoil injuries, and use safety goggles or a face shield to protect your eyes from metal debris or snapping parts. Avoid loose clothing or jewelry that could get caught in moving mechanisms.
Disconnect the Garage Door Opener and Secure the Door
Before making any adjustments to the torsion springs, disconnect the power to the automatic garage door opener to prevent accidental activation. This can typically be done by unplugging the opener unit from the ceiling outlet or switching off the breaker at the electrical panel.
Then, lower the garage door fully and secure it in the down position using clamps, locking pliers, or C-clamps on the tracks just above the bottom rollers. This is critical—never attempt to work on the torsion springs while the door is open or partially raised, as this can cause the door to crash down unexpectedly, leading to serious injury or property damage.
How to Change Garage Door Torsion Springs: A Step-by-Step Guide
Step 1: Identify the Spring Type and Size
Garage doors may be equipped with one or two torsion springs, depending on the size and weight of the door. Before purchasing replacements, take precise measurements of the existing spring. Key specifications include:
- Length (in a relaxed state)
- Inside diameter
- Wire size (gauge or thickness)
These measurements are critical for selecting a spring that can safely and effectively balance your door.
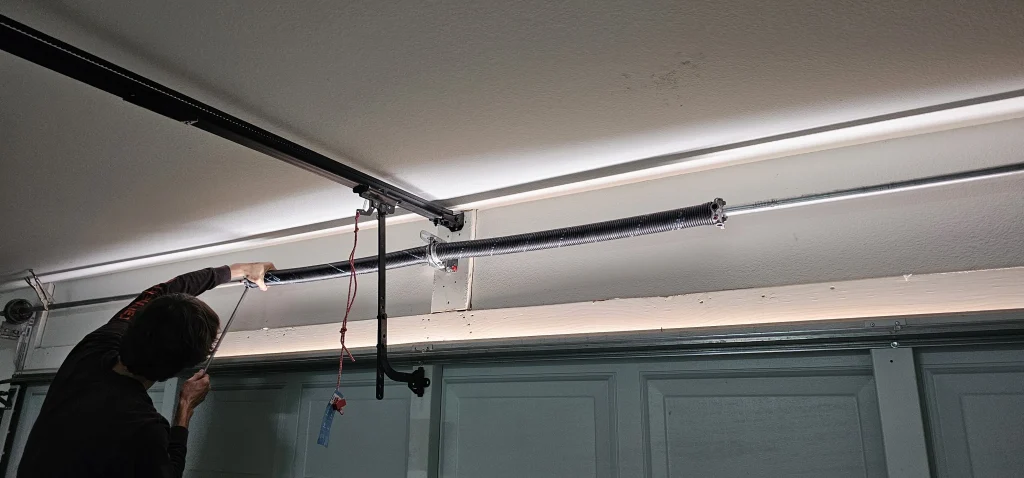
Step 2: Mark and Loosen the Winding Cone Screws
Insert a winding bar into one of the holes in the winding cone and hold it firmly. Then, slowly loosen the set screws on the cone with a wrench.
Before proceeding, mark the current position of the spring using chalk or a marker. This reference will help ensure proper placement of the new spring later in the process. Keep both hands on the bars to avoid slippage or sudden release of tension.
Step 3: Unwind the Old Spring
Carefully rotate the winding bars to release the tension in the spring gradually. This step must be done with complete control—never let go of the winding bar while it’s under load.
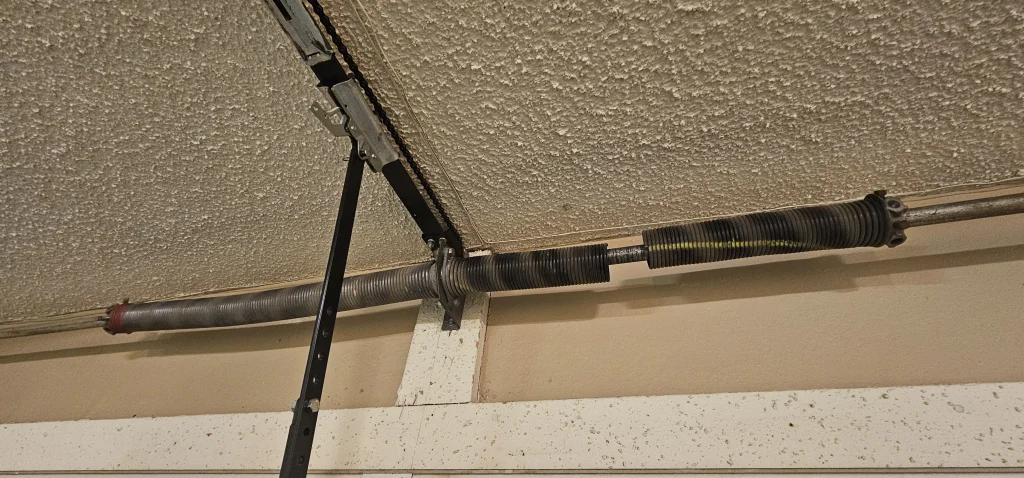
Once the spring has fully unwound, slide it off the torsion bar. If your system has two springs, repeat this process on the opposite side.
Step 4: Remove and Replace Hardware
After removing the spring, slide off the center bearing, cable drum, and any other components that need to be detached. Then:
- Slide the new torsion spring onto the torsion bar
- Reinstall the center bearing and cable drum, making sure all components are correctly aligned.
- Secure them using the appropriate hardware and tighten everything firmly.
Step 5: Wind the New Spring
Using your winding bars, apply the manufacturer-recommended number of turns to wind the new spring. This is typically based on the door height and spring size (e.g., 7.5 turns for a 7-foot door).
Once wound, tighten the set screws on the winding cone securely to hold the spring in place. Repeat this step for the second spring if your system uses a pair.
Step 6: Recheck and Test the Door
Remove all clamps or locking pliers from the tracks, and reconnect the garage door opener. Then:
- Slowly raise the door manually to test for balance
- The door should lift smoothly and stay in place when opened halfway.
- If the door feels too heavy or too light, you may need to adjust the spring tension to achieve the desired balance.
Test the door multiple times to confirm safe, consistent operation before resuming automatic use.
Signs You Shouldn’t Attempt Torsion Spring Replacement Yourself
Changing torsion springs carries a high risk of injury if not performed correctly. If you notice excessive rust, warped components, or lack the necessary tools, stop and call a professional. If your door uses high-cycle or specialty springs, it’s even more important to consult an expert.
Professionals not only ensure safe spring replacement but also inspect the entire system to catch underlying issues. Attempting this repair without adequate experience can lead to further damage or costly mistakes.
Maintenance Tips After Replacing Torsion Springs
Perform Regular Balance Tests
Open the garage door halfway and release it. If it stays in place, the spring tension is balanced. If it moves, you may need to readjust the tension.
Lubricate Moving Parts
Apply lubricant to the torsion springs, rollers, and hinges on a monthly basis. This reduces friction and extends the life of your garage door system.
Schedule Annual Inspections
Even after a successful replacement, it’s wise to schedule yearly inspections with a technician. This ensures your torsion system remains in good working order.
Frequently Asked Questions
How often do you need to replace a torsion spring on a garage door?
Torsion springs typically last between 7 to 10 years or about 10,000 cycles (one cycle is one full open and close). If your garage door gets frequent use, replace the springs sooner.
How to choose the correct garage door torsion spring?
You need to match the spring to the weight and height of your garage door. Essential factors include wire size, spring length, and inside diameter; using the wrong spring can lead to poor operation or safety risks.
How to determine left or right torsion spring?
Face the door from inside the garage; the spring on the left is a right-wound spring, and the spring on the right is a left-wound spring. This is because torsion springs are wound in the opposite direction of their intended position to achieve proper tension.
Can I put a heavier torsion spring on my garage door?
Using a heavier torsion spring than needed can cause the door to open too quickly or not close properly. It’s important to use the correct size to ensure safe and balanced operation.
What happens if the garage door spring is too strong?
If the spring is too strong, it can make the door hard to close and may put excess strain on the opener. This can lead to safety issues and premature wear on garage door components.
Conclusion
Understanding how to change garage door torsion springs can improve the safety and performance of your garage door. Still, it’s a task that requires precision, patience, and strict adherence to safety procedures. These springs are under high tension and can cause serious injury if mishandled, which is why professional assistance is strongly recommended.
We provide a step-by-step process for safely and effectively replacing garage door torsion springs. From identifying the correct spring type to proper tensioning and alignment, each step is essential for restoring smooth, reliable operation. Follow our instructions carefully to ensure long-term garage door function and minimize safety risks.
If you’re unsure about performing the replacement yourself, GT Garage Door Repair is here to help. Our skilled technicians ensure your garage door system operates safely and efficiently, reducing risk and extending the lifespan of your setup.
End Note
GT Garage Door Repair can examine and repair your garage door if needed and recommend solutions that align with your system and budget. Our garage door repair and maintenance services are designed to deliver long-lasting results, ensuring your safety, convenience, and peace of mind.
If you need torsion cable or garage door spring repair in Chandler, Arizona, don’t hesitate to contact us. Whether it’s spring replacement, garage door installation, or opener troubleshooting, we’re ready to help.
We proudly serve Chandler and surrounding areas, including Sun Lakes. Learn more about us on our About Us page, explore our helpful FAQs, read verified reviews, or browse our latest tips on our blog. You can also stay connected on Facebook and Yelp. Reach out directly through our contact page to schedule service or request more information.
GT Garage Door Repair
415 W. Boxelder Place, Chandler, AZ 85225
(602) 680-9700